Lighting
There are some amazing LED headlight modules on the market now. These have the added advantages of greater light output compared to halogen bulbs and also reduce the load on the alternator by about 50%.
I've decided to go down the route of fabricating my own rear lights using 3D printing technology. This way, I will get the beautiful design that I require and it will be amazingly light. The other thing I've subsequently discovered is that this approach will also be significantly cheaper and result in much high quality lighting, that looks fantastic.
The current trend with modern car lights is to blend it into the curves and shapes of the car. Much of it uses LEDs and 'light tubes' to provide complex shapes. Many cars (e.g. Audi) use thin strips of lighting. On a lot of modern cars, I really wonder if the designer actually tested the lights on at night, to see what they look like to people outside of the car!
Another modern trend is to mount different lights next to each other or within each other. I find this provides very poor in terms of visibility. Many of the lights on modern cars (such as VW's) are very difficult to see, with designs that place indicators inside very bright brake lights. Whilst it is right to make lighting aesthetically pleasing, it is primarily there for a functional purpose, to convey presence and information to other road users. My lighting designs will do this very well and to my eyes, will look stunning at the same time :-)
My approach is to keep the shapes simple and to have a clear separation between lighting functions. All of the lights on this car will be round (or a round ring) to keep a consistent design theme. All of the lights will have a decent surface area (which is a big part in improving visibility), to ensure they are clearly visible and all will have a wide viewing angle.
Headlights
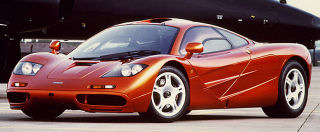
I really like the idea of using paired front lights, to mirror the rear of the car. This works really well on the McLaren F1. Another good reason for this approach is that the polycarbonate cover reduces air resistance and I'm aiming for a very low drag coefficient with this car.
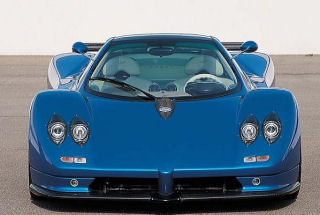
| The Zonda approach works quite well too but it is not as tidy. |
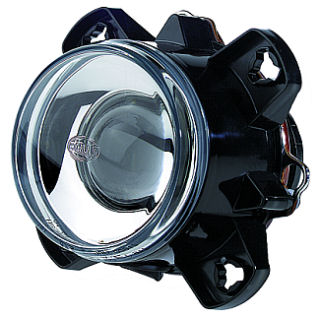
| Hella produce a 90mm diameter low beam, halogen headlamp module, which would allow the above look. These are quality off-the-shelf units with adjustable mounting frames. They are also very light in weight. |

| Hella produce a 90mm diameter high beam, halogen headlamp module, to match the above lamp. |
Hella also do a bi-halogen 90mm single lamp that combines both low beam and high beam in a single unit.
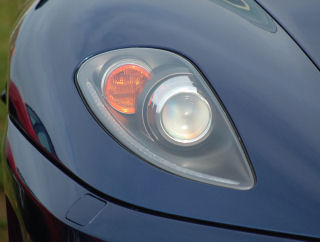
| There are several ways to mount the lights into the bonnet. The first option is to have a hole cut into the bonnet and to fix a mounting frame or moulding from behind. This photo shows how it has been done on the Ferrari F430. In this instance the colour is different to the bodywork but, it doesn't have to be the case. |

| The second option is to mould the mounts for the lighting into the bonnet itself and to then mount the lights in from behind. This photo shows how this has been done on the Ferrari 360. |
In both of the above cases, the headlight cover is a slightly curved and shaped sheet that has been designed to sit into matching shaped cut-out, with a lip for it to sit on. The result is that it sits flush with the bonnet surface. I like this approach as it is simple, water-proof and should be easy to do.
I loaned a Mk IV MX-5 from Mazda in 2015 and was really impressed by the LED headlights on this car. It also featured adaptive lighting system, which means the lights can turn based on speed and steering input. It worked really well but adds unecessary complexity and weight on a car like this in my view.
Side Lights
The IVA requirement is that the sidelights can be switched on/off or left on when the ignition is off. This means they can't be powered via the ignition switch.
My plan is to use white LED clusters on the inside or around the main headlights.
Daytime Running Lights
The IVA requirement is that day-time running lights switch off, when the side lights or headlights are switched on.
To improve safety, I'd like to have some bright, LED daytime running lights. As much as I don't like the idea of the extra weight, I typically drive the Fury with headlights on. In such a low car you need to have lights on, to improve visibility. I also drive down country lanes and B-roads a lot, often with over-hanging trees.
In an ideal world, I would be able to combine this function with the side-lights, so that I don't need to drive around with the halogen low-beam headlights on. This would also avoid confusion with fog lights. LED lights draw less power from the engine and last longer. This plan will only work if they are both legal and bright enough.
Note that these are not front fog lights. They are also not driving lights, which should be linked to the high-beam headlights and are designed to augment the high-beam lighting pattern, well described here.
Indicators
The legal flash rate for indicators is between 60 to 120 flashes per minute.
My plan is to use orange LED clusters on the outside of the main headlights.
Side Repeaters
The are plenty of off the shelf LED units available.
Rear Lighting Options
Rear Light Clusters
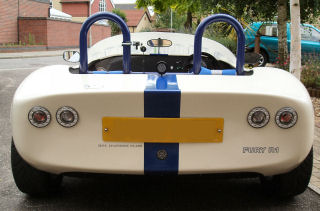
| On my Fisher Fury R1, I used double round lights. The outer LED rings are both side lights. The inner centres are brake lights and the outer centres are indicators. This layout is minimalist and one I really like. I used smoked inner center lenses with red bulbs for the brake lights. These lights are not longer available but a similar replacement is. |
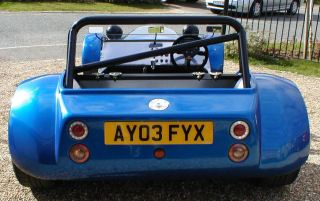
| When a friend of mine fitted similar rear lights to his Sylva Striker, he recessed them into the bodywork. I didn't do this on my Fisher Fury R1 because it has a coloured gel-coat finish and is not spray painted but, this car will be painted and recessed lights look much better. |
You also need rear reflectors for the IVA test.
Fog Light
On my Fisher Fury R1, I used 52mm recessed LED cluster and I plan to do the same this time. It's a stylish, subtle, reliable and light-weight solution. I'm also tempted to mount clustered, individual white (but red when on) 5mm LEDs into the bodywork this time, to make it even more subtle.
Reversing Light
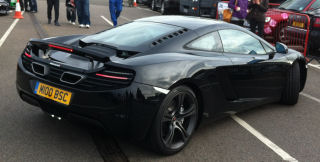
| The current IVA test requires that the car has a reverse gear and reversing light. I planned to do something clever with a combined reversing light and high-level brake light. I just happened to be at Snetterton race circuit and see this MP4-12C reversing. These two tiny LED lights must be E-marked and look like an ideal solution. |
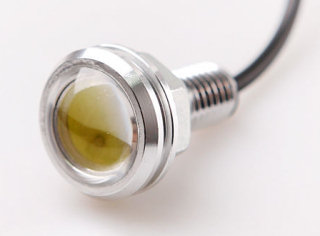
| I'm currently testing these LED lamps on the Fury R1 as daytime running lights. They are seriously bright, whilst being very compact and light weight. |
Number Plate Lighting
On the Fisher Fury R1, I used Lite'N Boltz. These are stainless steel bolts with lamps built in. This is a clever solution and I wanted to use something very similar this time round but, with white LEDs and also made from a lighter material.
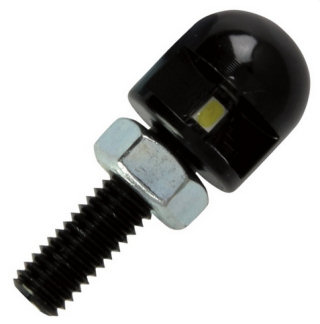
| These aluminium LED number plate lights are the best alternative I've seen so far. |
My preferrence now though is to have the rear number plate mounted into a shallow recess in the bodywork. This means that the plate can be lit from above, using some warm-white LEDs, fitted (hidden) within the bodywork. This looks better, is simpler, cheaper and lighter. The number plate will be held in place by two 3mm stainless steel 'button head' bolts.
Rear Lighting Decision
I've decided to make the rear lighting look really good and to also be as light-weight as possible. I've also taken an approach that makes it cheap and reliable. I plan to use readily available 5mm 'top hat' LEDs integrated directly into perspex discs for the rear lighting. Patterns of 5mm holes will be drilled into a 100mm diameter × 5mm thick mounting disc and the LEDs fixed from behind, to create a flat external surface. The rear electronics will be encapsulated in black potting compound to ensure they are waterproof.

| This it then covered with a 90mm diameter × 3mm thick lightly smoked perspex disc and this will fit through a 90mm diameter hole in the bodywork, to sit flush with the external surface. I using 'clear' LEDs because under sunlight they won't look like they might be on, because there is no way they can reflect red or orange light back. From the rear of the car, just four smoked 90mm circles will be visible. This approach will work regardless of the colour of the paintwork. |
Like my Fury, the two outer rings on each of the car are red side lights and driven at ~20mA. The outer inside cluster of LEDs are the orange indicators and the inner cluster of LEDs are the red brake lights. The LEDs in the inner clusters are driven at 25mA. There is also a single white LED in each light and these are the reversing lights, also driven at 25mA using a current limiting IC.
The inner cluster design (of 15 LEDs) will also be used to create the fog light and the high-level brake light. These will use clear perspex covers though. This means all the rear lighting is going to cost me less than £30 but, more importantly, it will weigh very little.
Power Considerations
There is a reason why modern LED lighting appears to flash when captured on a video camera. The LEDs are driven via circuit which uses Pulse Width Modulation (PWM) to limit the current through each LED. An LED typically has a forward voltage of 3V dc, so you can just connect it to the 12V dc power found in a car. That 12V is also fairly variable and can be as high as 14V.
I want to avoid using PWM circuits and drive the LEDs directly via resistors as this means things are much simpler. The LEDs I'm using can be grouped with 5 in series with a low value resistor (typically around 100 ohms). This is why all the lights are built usingmultiples of 5 LEDs. For the single reversing light LED in each light I'm using cheap current limiting Integrated Circuits (LM317L ICs). This keeps things simpler, lighter, cheaper and is more reliable.
Wiring & Connectors
The rear lights are wired up using 7/0.2 wire to an 8-way connector.
- Side lights
- Brake lights
- Fog light
- Ground for above three lights
- Left indicator
- Right indicator
- Reversing lights
- Ground for above three lights
Each outer ring uses 100mA at 12V and the inner lamp clusters use 75mA. This is why I can use low current switch gear and very thin wiring, saving even more weight :-)